| 일 | 월 | 화 | 수 | 목 | 금 | 토 |
|---|---|---|---|---|---|---|
| 1 | 2 | 3 | 4 | 5 | 6 | 7 |
| 8 | 9 | 10 | 11 | 12 | 13 | 14 |
| 15 | 16 | 17 | 18 | 19 | 20 | 21 |
| 22 | 23 | 24 | 25 | 26 | 27 | 28 |
- 영어회화
- 특수대학원
- 3dprinter
- 프로그래밍
- 4차산업
- 영어
- 파이썬gui
- 오픽
- 동사
- 머신비전
- 머신러닝
- machinevision
- Python
- Vision
- 딥러닝
- 석사
- coding
- 영어기초
- 초보영어
- opencv
- 코딩
- C언어
- 직장인
- 파이썬
- 영어공부
- 대학원
- Ai
- 산업대학원
- 인공지능
- ComputerVision
- Today
- Total
미래기술연구소
[패스트캠퍼스 수강 후기] 컴퓨터비전인강 100% 환급 챌린지 7 회차 본문
인증샷좀 그만 찍고싶음 모니터 찍는게 전부인데 ㅡ.ㅡ


아놔 또 찍음
들어가기 전 COCO Dataset 이 뭘까?
공식 홈페이지는 http://cocodataset.org/#home 입니다.
coco Dataset은 detection, segmentation, captioning 데이터 집합입니다.
coco dataset을 이용하여 매년 detection, keypoints, stuff, Panopti, Captions의 카테고리로 매년 전 세계 다양한 기업과 학생들이 참가하는 대회를 운영하고 있습니다.
사용 방법은 http://cocodataset.org/#download 을 참고하여 진행해야 합니다.
coco dataset 관련하여 참고할만한 자료들은 하단에 첨부하겠습니다.
유튜브 youtu.be/h6s61a_pqfM

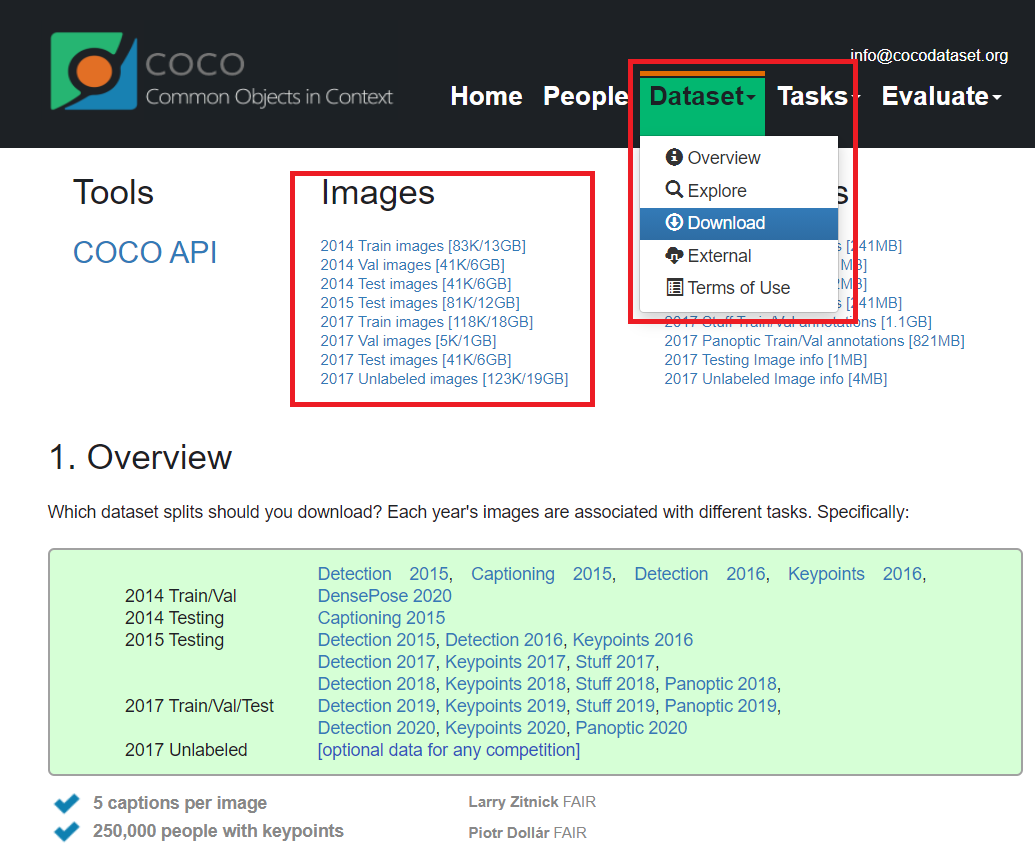
images 에는 수만장의 데이터set 이 포함되어 있음
이 데이터들을 직접 다운받아 학습시켜도 되고
위에 설명과 같이 학습이 다 되어있는 weights (model) 를 바로 사용하여도 됨
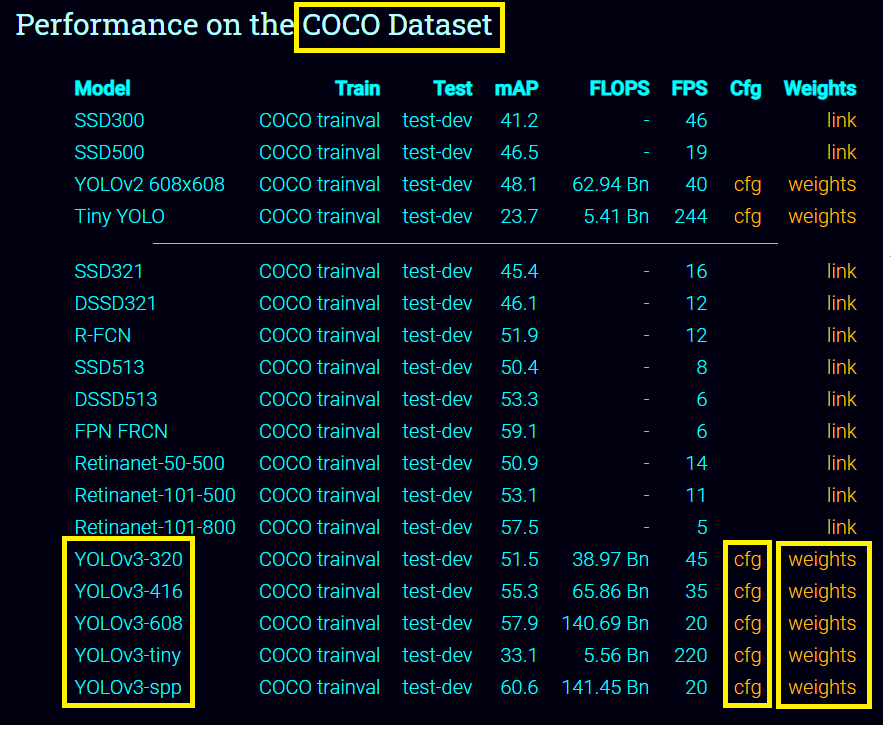
▪ cfg : config files ( configuration files )
▪ weights : 학습이 완료 된 yolo 의 model 파일. 확장자 weights
▪ YOLOv3 : 320 / 416 / 608
( 320 : FPS ↑ , mAP ↓ ) , ( 608 : FPS ↓ , mAP ↑ )
▪ YOLO v3 객체 검출

▪ YOLO란?
• You Only Look Once
• 실시간 객체 검출 딥러닝 알고리즘
• https://pjreddie.com/darknet/yolo/
YOLO: Real-Time Object Detection
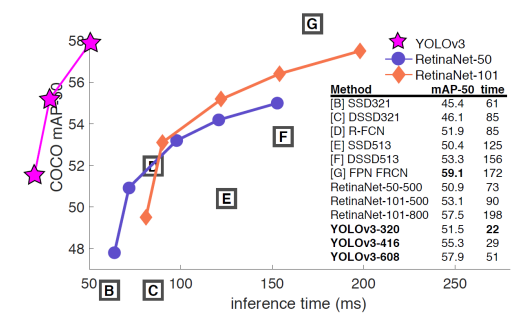
YOLO: Real-Time Object Detection You only look once (YOLO) is a state-of-the-art, real-time object detection system. On a Pascal Titan X it processes images at 30 FPS and has a mAP of 57.9% on COCO test-dev. Comparison to Other Detectors YOLOv3 is extremel
pjreddie.com
▪ YOLOv3
• 2018년 4월 발표된 Tech Report
▪ https://arxiv.org/abs/1804.02767
• 기존 객체 검출 방법과 성능은 비슷하고 속도는 훨씬 빠름
• COCO 데이터셋(cocodataset.org/#home) 사용
▪ 80개 클래스 객체 검출
YOLOv3: An Incremental Improvement
We present some updates to YOLO! We made a bunch of little design changes to make it better. We also trained this new network that's pretty swell. It's a little bigger than last time but more accurate. It's still fast though, don't worry. At 320x320 YOLOv3
arxiv.org
COCO - Common Objects in Context
cocodataset.org
▪ YOLOv3 네트워크 구조
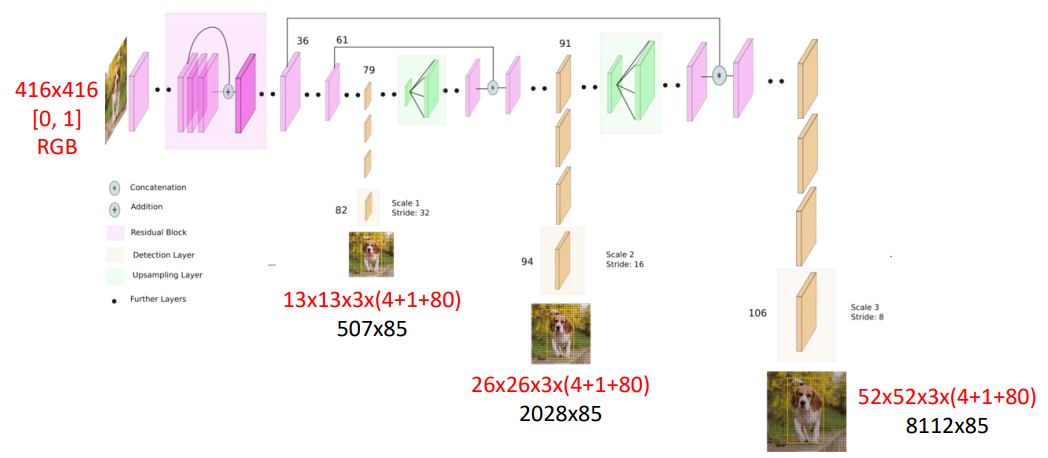
네트워크 구조 설명 :
416 x 416 size 의 color 영상으로 입력을 하게 됨
picxel 영상의 범위는 0, 1 로 Normalization 되어 있음
color channel 은 R, G, B 순서
Out Put 총 세군데가 있음

object detection = 82 Layer + 94 Layer + 106 Layer
82 Layer : 13 x 13 x3 x ( 4 + 1 + 80 ) = 507 x 85
94 Layer : 26 x 26 x 3 x ( 4 + 1 + 80 ) = 2028 x 85
106 Layer : 52 x 52 x 3 x ( 4 + 1 + 80 ) = 8112 x 85
▪ YOLOv3 입력
• Size: (320, 320), (416, 416), (608, 608)
• Scale: 0.00392 (1/255.)
• Mean: [0, 0, 0]
• RGB: true
▪ YOLOv3 출력
• 3개의 출력 레이어
▪ outs[0].shape=(507, 85), 507=13*13*3
▪ outs[1].shape=(2028, 85), 2028=26*26*3
▪ outs[2].shape=(8112, 85), 8112=52*52*3

▪ YOLOv3 모델 & 설정 파일 다운로드
• 모델 파일
▪ https://pjreddie.com/media/files/yolov3.weights

• cfg. 열면 github 로 연결


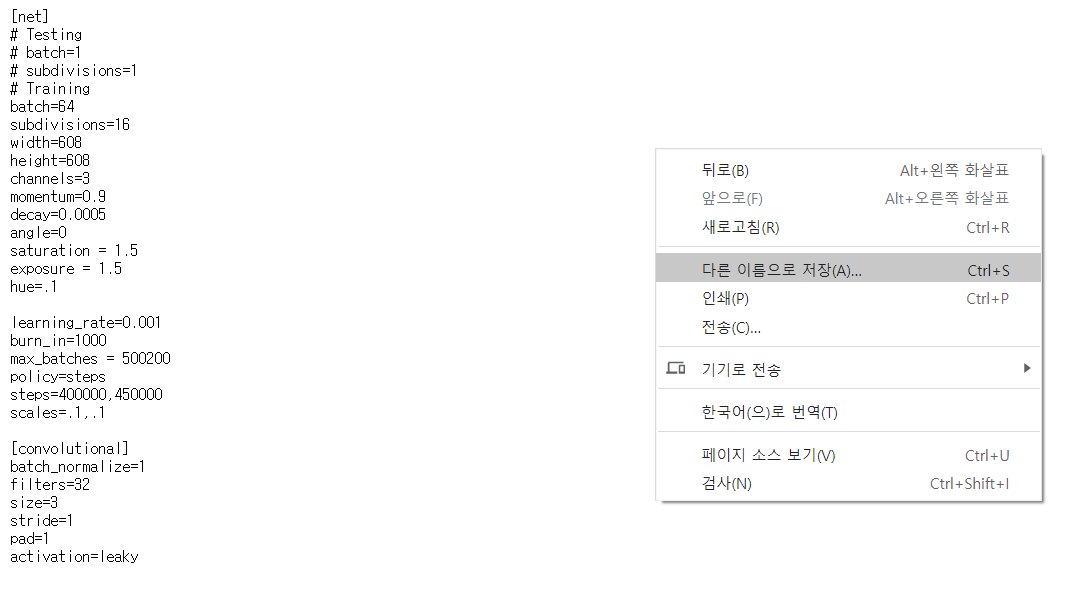
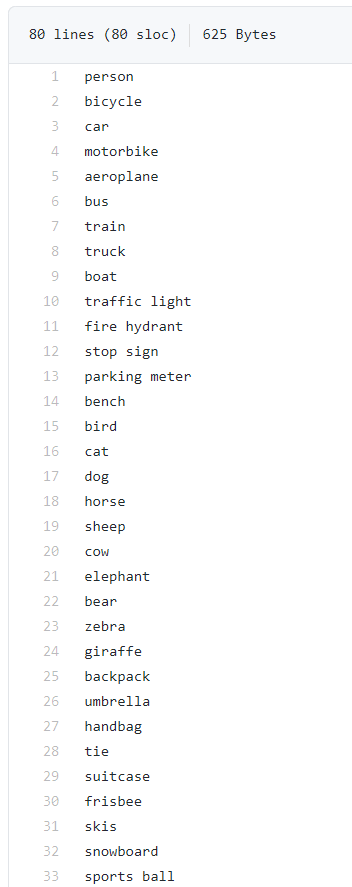
• 클래스 이름 파일
▪ github.com/pjreddie/darknet/tree/master/data에서 'coco.names' 를 찾아서 위와 같이 저장 한다
pjreddie/darknet
Convolutional Neural Networks. Contribute to pjreddie/darknet development by creating an account on GitHub.
github.com

YOLOv3 객체 검출 예제
# 네트워크 생성
net = cv2.dnn.readNet('yolo_v3/yolov3.weights', 'yolo_v3/yolov3.cfg')

# 출력 레이어 이름 받아오기
layer_names = net.getLayerNames()
output_layers = [layer_names[i[0] - 1] for i in net.getUnconnected0utLayers()]\

#입력 영상
img = cv2.imread('dog.jpg')
h, w = img.shape[:2]

# 블롭 생성 & 추론
blob = cv2.dnn.blobFromImage(img, 1/255.,(416, 416), swapRB=True)
net.setInput(blob)
outs = net.forward(output_layers)

# outs는 3개의 ndarray 리스트.
# outs[0].shape=(507, 85), 13*13*3=507
# outs[1].sahpe=(2028, 85), 26*26*3=2028
# outs[2].shape=(8112, 85), 52*52*3=8112
YOLO-v3 객체 검출 예제(Con't)
class_ids = []
confidences = []
boxes = []

for out in outs:
    for detection in out:
        scores = detection[5:]
        class_id = np.argmax(scores)
        confidence = scores[class_id]
        if confidence > 0.5:
            cx = int(detection[0] * w)
            cy = int(detection[1] * h)
            bw = int(detection[2] * w)
            bh = int(detection[3] * h)
            sx = int(cx - bw /2 )
            sy = int(cy - bh /2 )

            #confidence 값이 0.5보다 큰 바운딩 박스를
            #모두 boxes에 추가. 이때 confidence와
            #class_id도 함께 기록.

            boxes.append([sx, sy, bw, bh])
            confidences.append(float(confidence))
            class_ids.append(int(class_id))

for i in indices:
    i = i[0]
    sx, sy, bw, bh = boxes[i]
    label = f'{classes[class_ids[i]]}: {confidences[i]:.2}'
    color = colors[class_ids[i]]
    cv2.rectangle(img, (sx, sy, bw, bh), color, 2)
    cv2.putText(img, label, (sx, sy -10),
                 cv2.FONT_HERSHEY_SIMPLEX, 0.7, color, 2, cv2.LINE_AA)

    cv2.imshow('img', img)
    cv2.waitKey()
'etc > FastCampus 챌린지' 카테고리의 다른 글
| [패스트캠퍼스 수강 후기] 컴퓨터비전인강 100% 환급 챌린지 9 회차 (0) | 2020.10.27 |
|---|---|
| [패스트캠퍼스 수강 후기] 컴퓨터비전인강 100% 환급 챌린지 8회차 (0) | 2020.10.26 |
| [패스트캠퍼스 수강 후기] 컴퓨터비전인강 100% 환급 챌린지 6 회차 (0) | 2020.10.24 |
| [패스트캠퍼스 수강 후기] 컴퓨터비전인강 100% 환급 챌린지 5 회차 (0) | 2020.10.23 |
| [패스트캠퍼스 수강 후기] 컴퓨터비전인강 100% 환급 챌린지 4 회차 (0) | 2020.10.22 |
